
OAuth 2.0 is a common way to secure your APIs. In Anypoint Platform, you can configure OpenID Connect (OIDC) client management in the External Identity section to use an external identity provider for authentications. (MuleSoft has an article that explains this in detail).
However, it is only possible to set this at the organisation level. What if different Business Groups have different OAuth requirements? What if Business Group A wants to use OpenAM while the root organisation has integrated with Okta?
In this blog, I am going to demonstrate a way to validate a user's access token against Okta within a Business Group, as opposed to the root Organisation level. This liberates a CloudHub organisation from the current restriction and allows each Business Group to choose its identity provider. We will explore the Client Credentials flow, which is ideal for machine-to-machine authentication.
Prerequisites
To follow this guideline you will need:
- A working API deployed to CloudHub - this can be any API. In this blog, I will refer to the Customer API
- An Okta account - you can create a free developer account from here
- Apache Maven - configured to use Mule Enterprise Repository
- A text editor of your choice
Creating a custom policy
MuleSoft provides several OAuth 2 policies out of the box. Unfortunately, none of them provide what we need as they all need an External Identity set up at the organisation level. Time to roll up our sleeves and get our hands dirty!
First, we need to create a custom policy. This article explains how to get started. Once we have created the template for the policy, the folder structure should look as below.
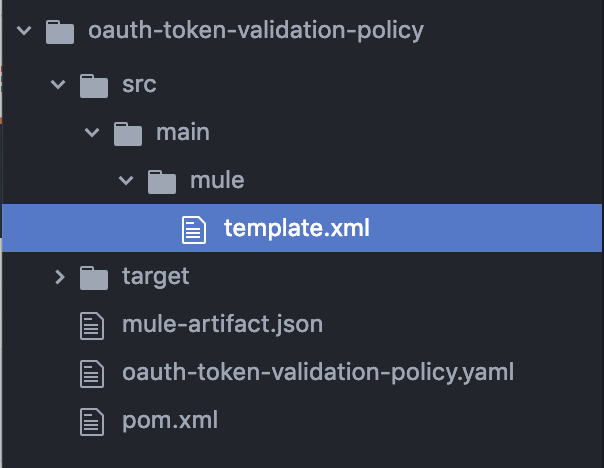
NOTE: Do not change the name of the file template.xml. If you do so, it will create errors when the policy is applied to an API.
Once we have created the template for the policy, we need to accept a few user inputs. We do that by editing the .yaml file which renders the policy configuration UI. We need the following inputs:
- Introspection Endpoint
- Introspection Client ID
- Introspection Client Secret
- Scopes
Introspection Endpoint is the Okta endpoint that would validates a user's access token. Introspection Client ID and Secret are the credentials which authorise the call to the Introspection Endpoint. When values for Scopes are provided, the policy validates the access token against the provided scopes.
After this, we need to populate the main policy file - template.xml.
The federation:open-id-config configuration details are set using the variables provided as user input. Usage of <try> and <error-handler> blocks handle errors from the federation extension. Most of the heavy-lifting is done by the mule-federation-extension component so be sure to add the dependency in your pom.xml file.
<dependency>
	<groupId>com.mulesoft.anypoint</groupId>
	<artifactId>mule-federation-extension</artifactId>
	<version>1.1.4</version>
	<classifier>mule-plugin</classifier>
</dependency>
Once this is completed, our custom policy is created and ready to go. Publish to Exchange, then we will apply to Customer API later.
Setting up Okta
In Okta, we are going to set up a few things.
- Create an introspection client and a service application
- Create a custom scope
- Modify the default policy
- Create a new access policy
Create an introspection client and a service application
We need to have an introspection client that is authorised to make a call to Okta's introspection endpoint. From the Okta console, create a service application named "Token Introspection Client".
Create another service application named "My Service App". This is the client application we will use to call the API.
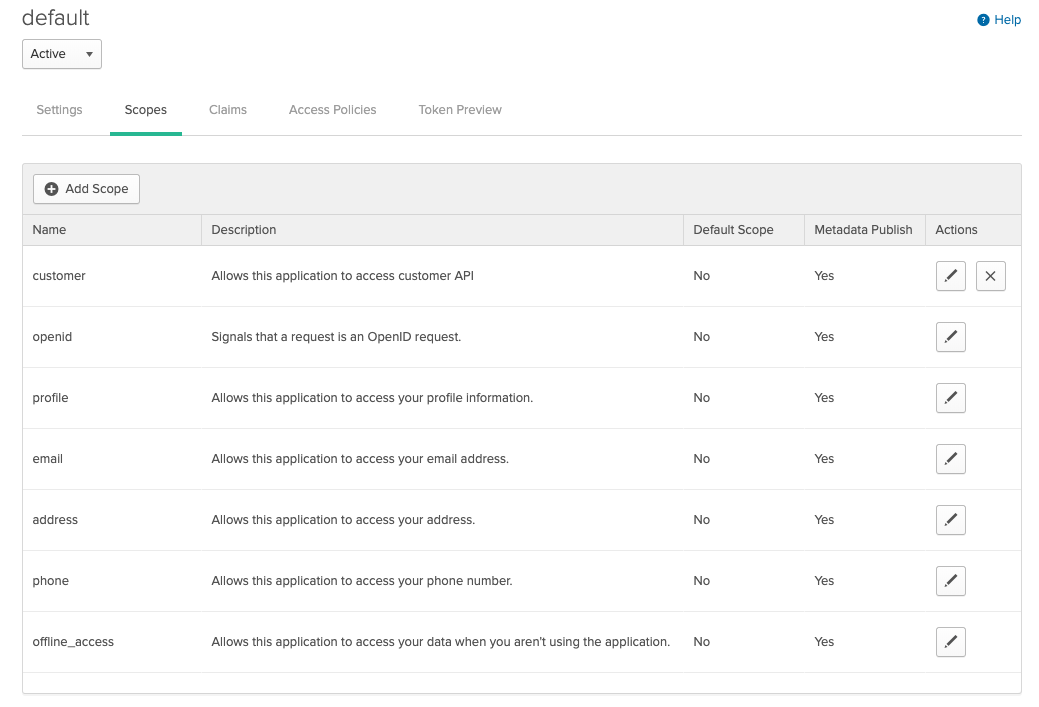
Create a custom scope
The Client Credentials flow never has a user context, so we will need to create a custom scope. A Scope allows us to control which application is allowed to consume the Customer API. Let's create a custom scope called customer.
Modify the default policy
Okta has a default policy that allows any application to request any scope. This includes the customer scope we've just created.
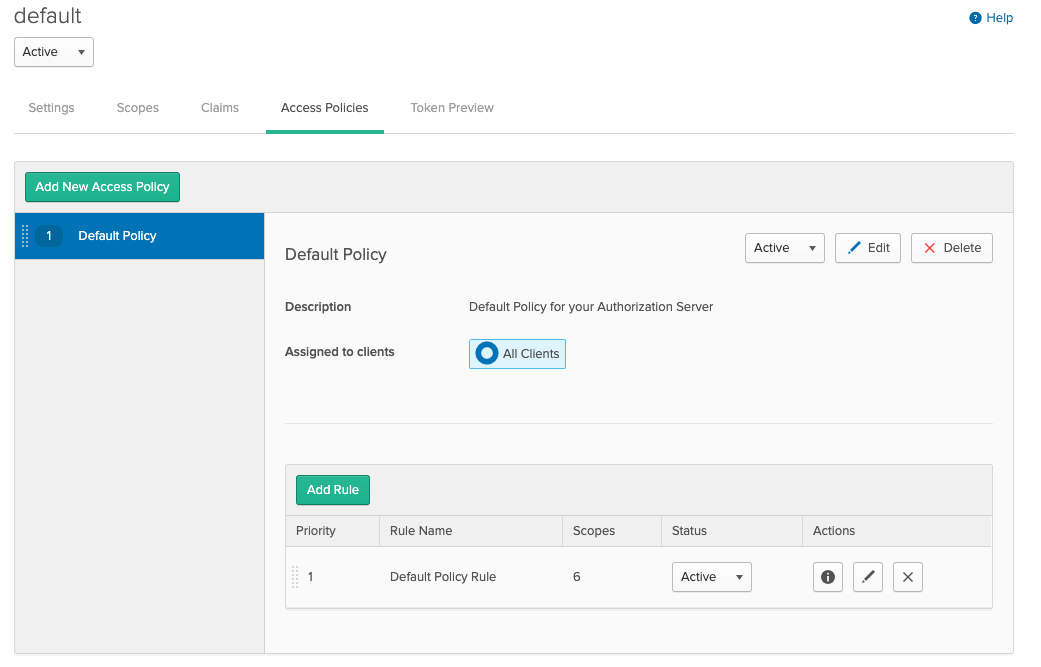
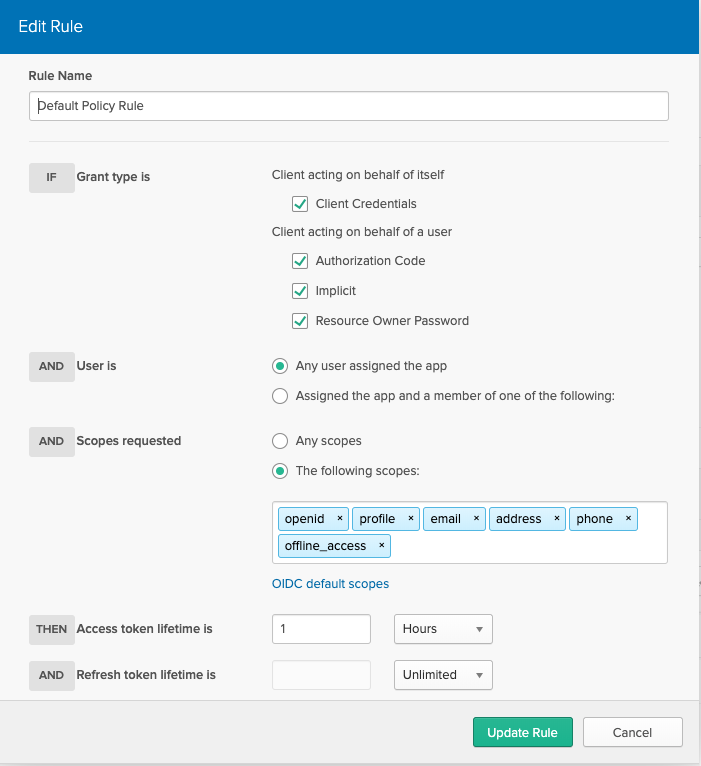
Let's edit the default policy rule. The rule below allows any client to request Open ID Connect (OIDC) default scopes only.
Create a new access policy
Out modified policy makes sure that no client can request the customer scope. Now we need to make an exception for our target client.
Let's create another policy for the My Service App client.
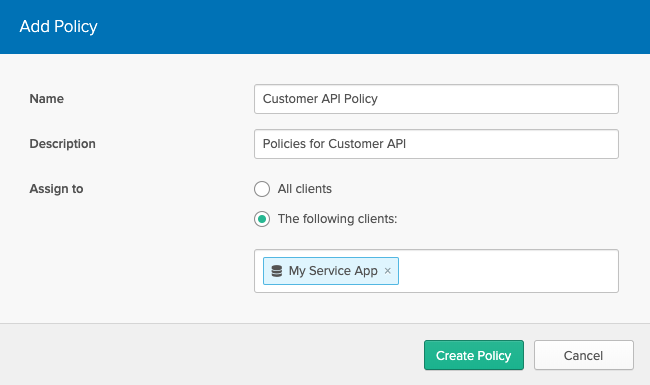
Add a new rule so that this client can request the customer scope we've created.
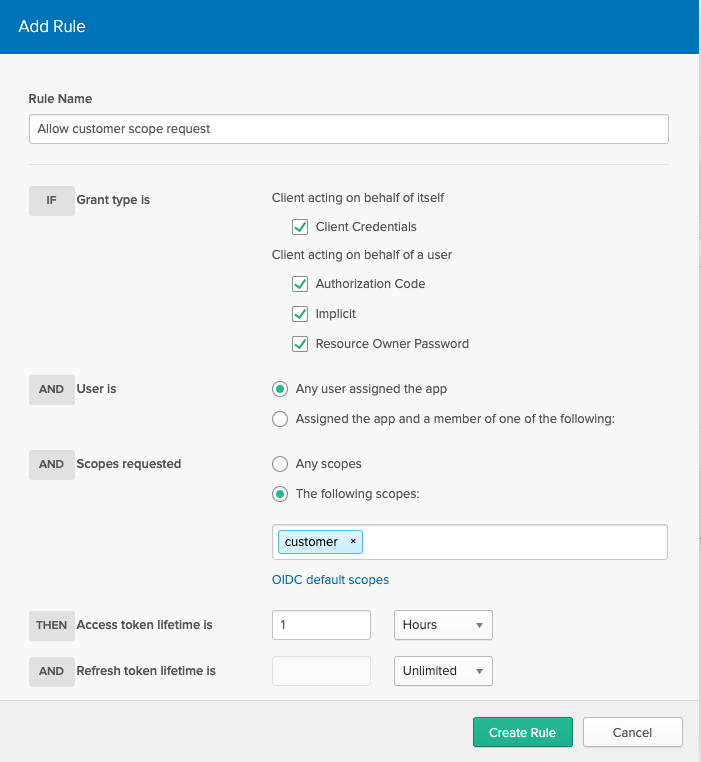
That's it. We have created an introspection client ID and secret to call the introspection endpoint. We have created the My Service App client and customer scope. We have also modified the policy so that only the My Service App client can request the customer scope.
Applying our custom policy
In CloudHub, navigate to API Manager -> Customer API -> Policies. Click on "Apply New Policy" and locate the custom policy we've created.
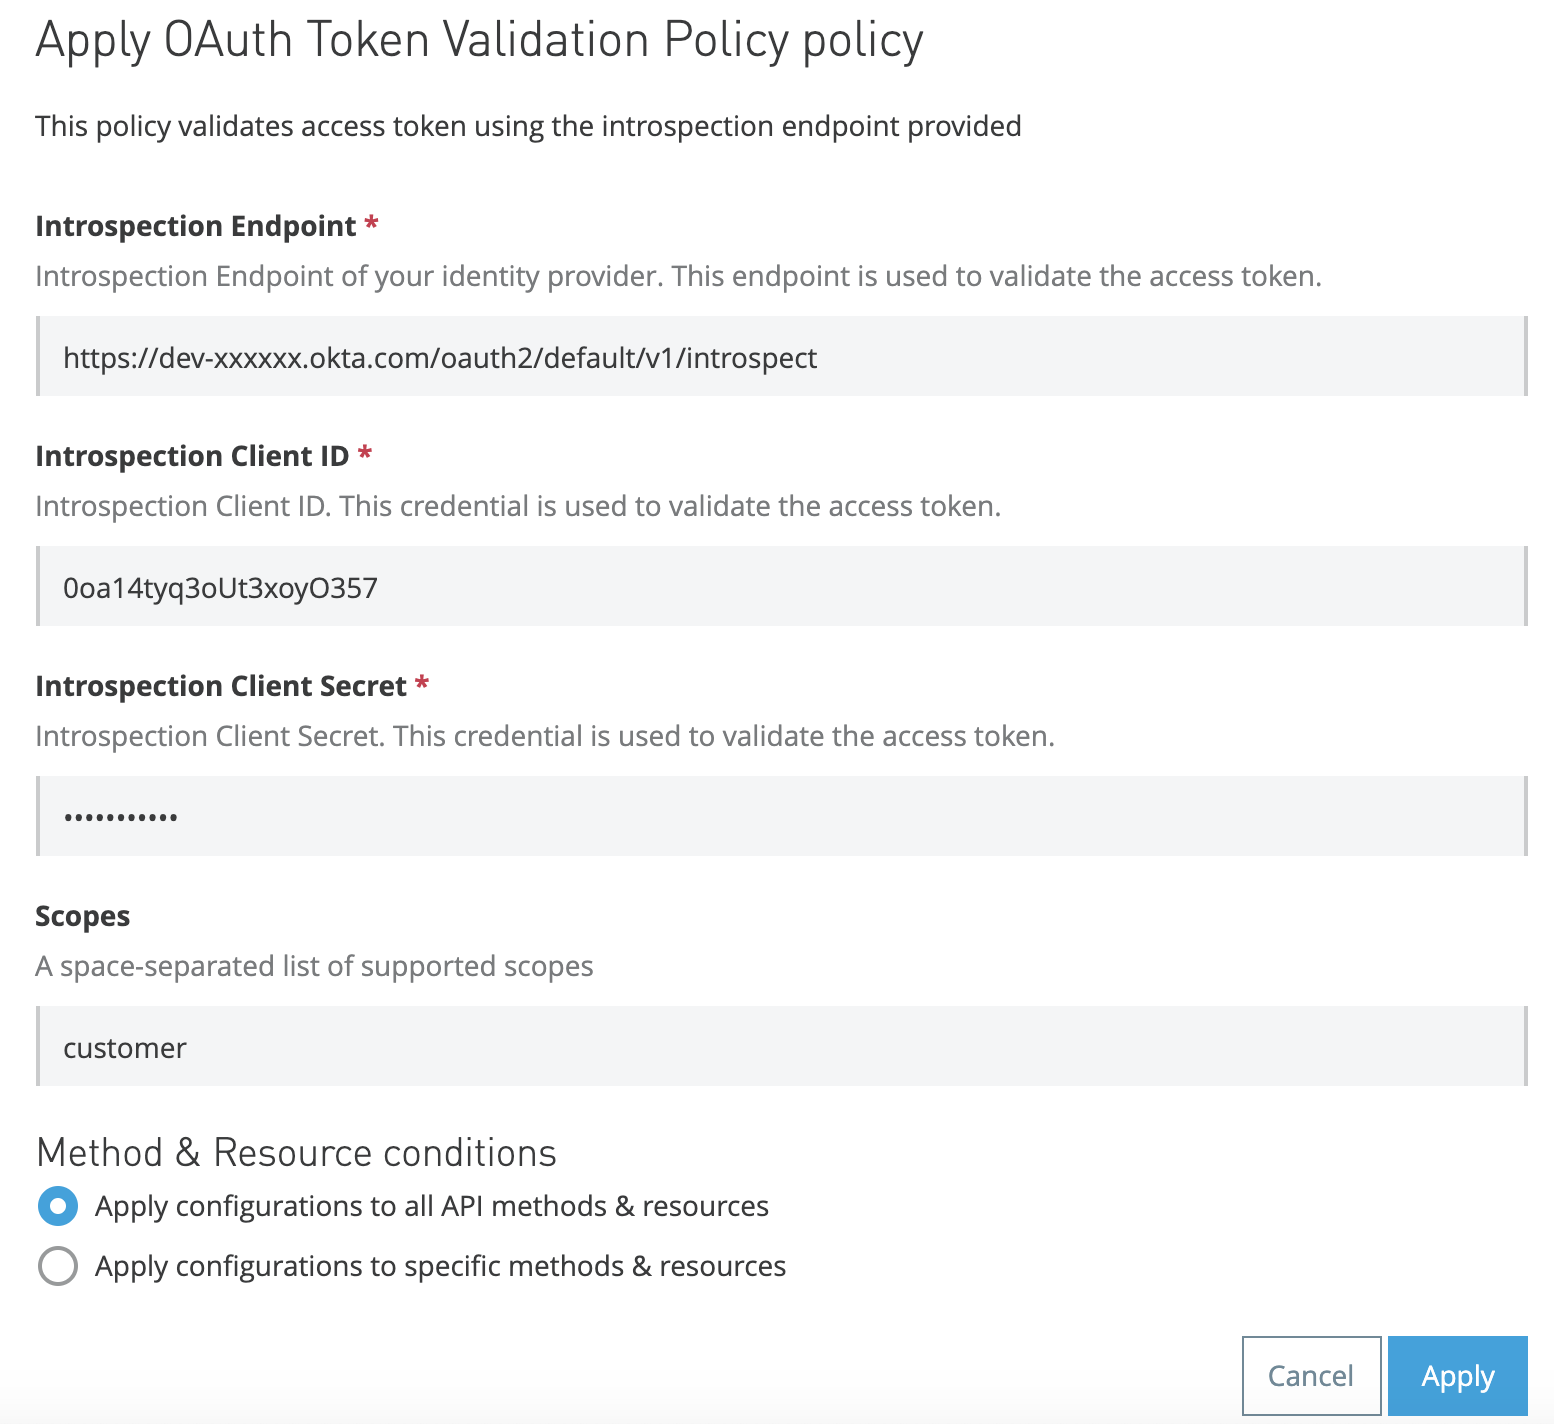
We can see that the policy is expecting four user inputs - this should match the .yaml file we've created earlier!
Test drive
It is all set! Now it is time for a test drive.
Overall the authorisation flow looks like this.
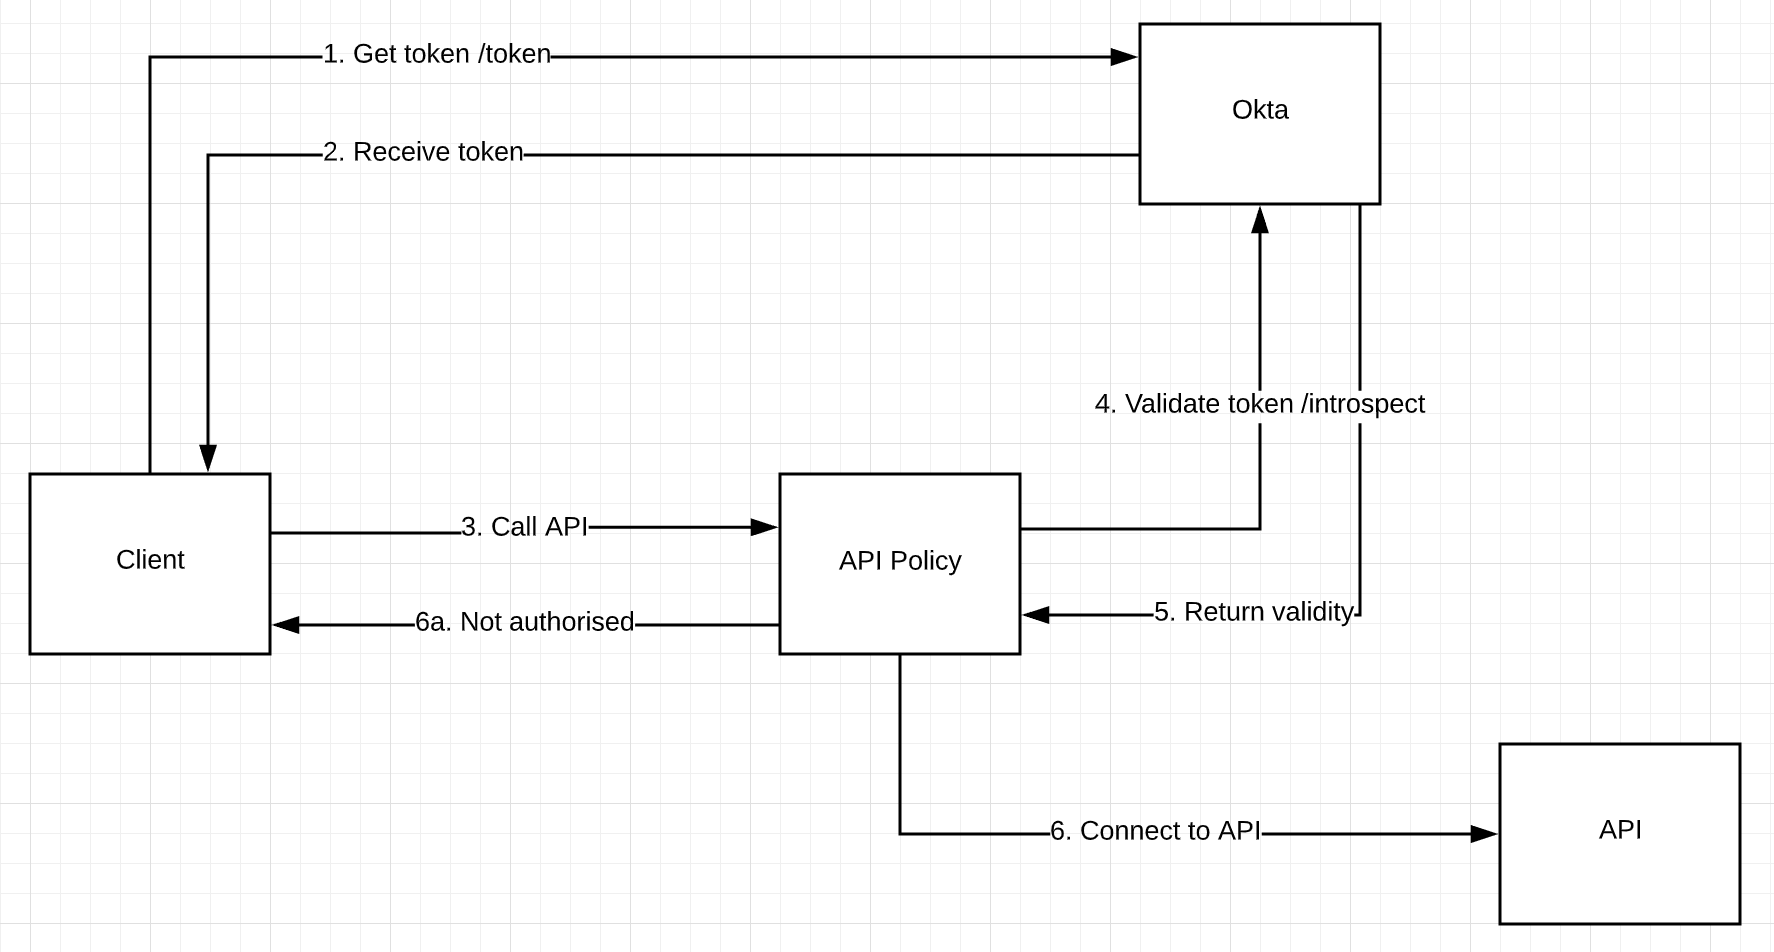
Let's start with getting an access token.
curl -X POST \
'https://dev-xxxxxx.okta.com/oauth2/default/v1/token?grant_type=client_credentials&scope=customer' \
-H 'Authorization: Basic bXlzZXJ2aWNlYXBwY2xpZW50aWQ6bXlzZXJ2aWNlYXBwY2xpZW50c2VjcmV0' \
-H 'Content-Type: application/x-www-form-urlencoded'
In request parameters, we are specifying the grant type of "client credentials", and scope of "customer".
The response should look similar to this.
{
  "token_type": "Bearer",
  "expires_in": 3600,
  "access_token": "eyJraWQiOiIzcFdzemE5T1BBb0tqbkNvUjVweGZJTy1pVWl2M21OX2xHWFFiUVFqeE13IiwiYWxnIjoiUlMyNTYifQ.eyJ2ZXIiOjEsImp0aSI6IkFULmRaOXRjTnhEZkdKWE1zMWphaEtjUXpCT3EzVU0yLUNfVG0zdmNycGhYSjgiLCJpc3MiOiJodHRwczovL2Rldi05MjI0NDAub2t0YS5jb20vb2F1dGgyL2RlZmF1bHQiLCJhdWQiOiJhcGk6Ly9kZWZhdWx0IiwiaWF0IjoxNTY2MTI2MTk0LCJleHAiOjE1NjYxMjk3OTQsImNpZCI6IjBvYTE0dHlxM29VdDN4b3lPMzU3Iiwic2NwIjpbImN1c3RvbWVyIl0sInN1YiI6IjBvYTE0dHlxM29VdDN4b3lPMzU3In0.F2LoIxR_8xc5NTD97dl0ydUA0MM7DwPS3gHZ8U564PdpIX9Mq7G2Bbyz-a1rqf0hINUoVjxhjEjBeFH87Gh0ol8lfV86uIwH80rl7pf8GbGGb9aQ727Lhy8f2OdZBm5dlSAUt5hz8RVRA7EwlACppWx52NXOXKYdbyqFfDwo7Z-DLpenGV3Ut_dsXs4OoTpF-i4kudyUEHSOCiiQ__aBQLdV7nHq455WIcTt7-v6yNCFkda2LC1ybxSDkgCOzZJUpy94Qs6pEBkAwp-OJQkNH6NX05q0P3stzJTM5oBNjVAnQSDi7-FHqlJhvVo1eSKfPqoky3EqmgZ0gUcy-yJPkg",
  "scope": "customer"
}
We are given an access token for the customer scope with an expiry date.
Now call the Customer API with the access token in the Authorization header. If the access token is valid, this should grant you access to the API. If the access token is invalid, the API will return an Unauthorized error.
Wrap up
In this blog, we have demonstrated a way to enable OAuth 2.0 for your Business Group. We have created a custom policy that accepts user inputs for introspection details. We have set up applications and access policies in Okta, and when the policy was applied to the API, the policy was able to carry the access token to Okta for validation and determine access to the API based on the validity.